https://support.xilinx.com/s/article/1053935?language=en_US
TITLE
AXI Basics 2 - Simulating AXI interfaces with the AXI Verification IP (AXI VIP)
AUTHOR
florentw
LAST PUBLISHED DATE
10/13/2021, 7:28 AM
BODY
Introduction to the AXI Verification IP (AXI VIP)
The Xilinx AXI Verification IP (AXI VIP) is an IP which allows the users to simulate AXI4 and AXI4-Lite. It can also be used as a AXI protocol checker.
This IP is only a simulation IP and will not be synthesized (it will be replaced with wires in the path-though configuration).
The AXI VIP core can be used for the following:
- Generating master AXI commands and write payload
- Generating slave AXI read payload and write responses
- Checking the protocol compliance of AXI transactions
It supports 5 different configurations:
- AXI master VIP
- AXI pass-through VIP without memory model
- AXI pass-through VIP with memory model
- AXI slave VIP without memory model
- AXI slave VIP with memory model
The AXI VIP core is documented in (PG267) and the APIs for the VIP are documented in the ZIP file you can download from this link.
AXI VIP example designs
An example design for the AXI VIP is provided in Vivado.
To generate the example design for the AXI VIP, you just need to follow these steps:
- Open a new project in Vivado 2019.2 and click IP Catalog.
- Search for the AXI Verification IP. Double-click it, configure the IP, and generate the IP.
- Right-click the IP and choose “Open IP Example Design”
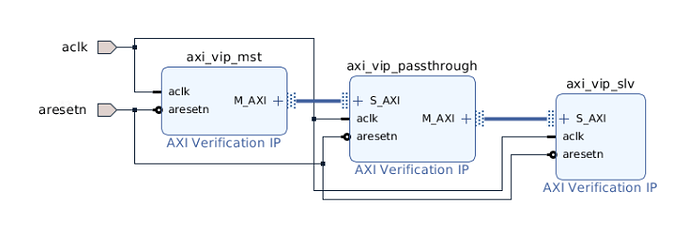
The example design for the AXI VIP includes 3 AXI VIPs: one configured as master, one configured as pass-through and one configured as slave.
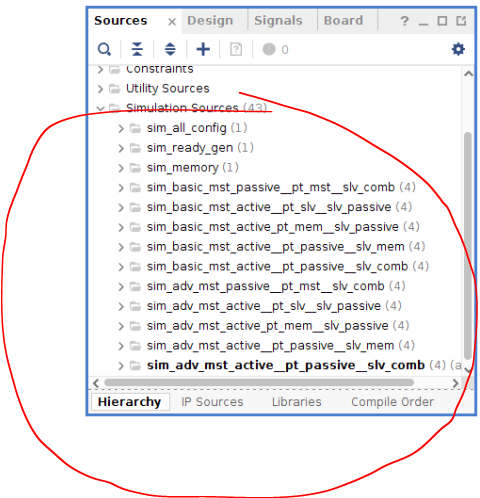
Multiple test benches are included in the project to use different combinations of the AXI VIPs:
Note: All of the test bench files are written in SystemVerilog. To enjoy all of the features of the AXI VIP, this IP should be included in a SystemVerilog test bench.
Analyzing AXI interface transactions
A useful feature in the Vivado simulation is the protocol instances which can be added to the waveform to see the signals at a transaction level.
I will go through the steps for the sim_basic_mst_active_pt_mem__slv_passive simulation set.
To use this simulation set, right click on it in the source window and click Make Active.
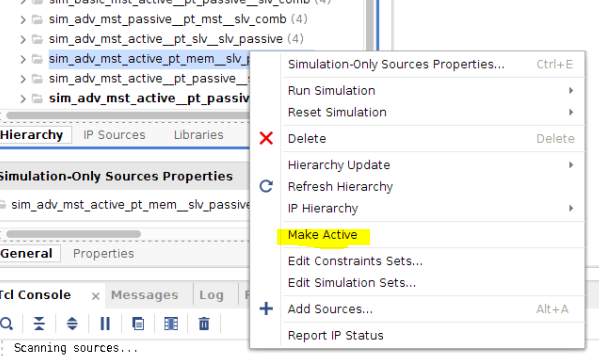
This simulation set only uses the Master AXI VIP and the pass-through AXI VIP (which is acting as a slave with a memory level).
We can run the simulation by clicking on Run Simulation from the Flow Navigator.
A waveform will be opened by default with only the clock and reset signals.
We will add the AXI interface between the Master AXI VIP and the pass-through AXI VIP.
In the S cope window, find and select the Master AXI VIP (axi_vip_mst) under DUT > ex_design. The Objects window will then show all of the ports of the IP. Find the M_AXI interface object and click Add to Wave Window.
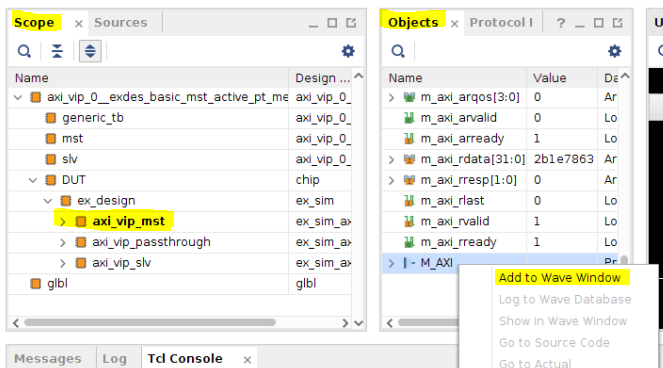
You will then be able to see the AXI transactions in the Waveform window:
We can see that between the beginning and the simulation time 1us, both Read and Write transactions have happened.
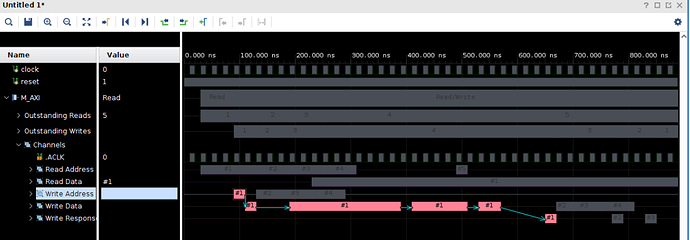
We can expand the M_AXI interface in the waveform window to see more details about these transactions:
The numbers on the channels correspond to the transaction numbers. We can see that 5 Read transactions are happening on the Read channels (purple) and 4 transactions are happening on the Write channels.
if you click on a specific transaction, you can see how the transaction is happening. For example, if we click on the first transaction on the write channels, we can see that this transaction is a burst transaction:
- The transaction starts by setting the address on the Write Address Channel
- Then a burst of data is sent on the Write Data channel
- Finally, the slave responds if the write was successful on the Write Response Channel
Additional Learning
If you want to learn more about AXI, please see the other tutorials in this series:
https://support.xilinx.com/s/topic/0TO2E000000YNxCWAW/axi-basics-series?tabset-50c42=2

