https://support.xilinx.com/s/article/1062002?language=en_US
TITLE
AXI Basics 4 - Using the AXI VIP as protocol checker for an AXI4 Master interface
AUTHOR
florentw
LAST PUBLISHED DATE
10/12/2021, 10:12 AM
BODY
Introduction
In the AXI Basics 2 article, I mentioned that the Xilinx Verification IP (AXI VIP) can be used as an AXI protocol checker. In this article we will see how we can use it to validate (and find errors) in an AXI4 (Full) Master interface.
Using the AXI VIP as an AXI4 protocol checker (tutorial)
-
Download the design files attached to this article
-
Open Vivado 2019.2
-
In the Tcl console, cd into the unzipped directory (cd AXI_Basics_4)
-
In the Tcl console, source the script tcl (source ./create_proj.tcl)
This will create a Vivado project with a Block Design (BD) including a custom IP with the Master AXI4 interface we want to verify
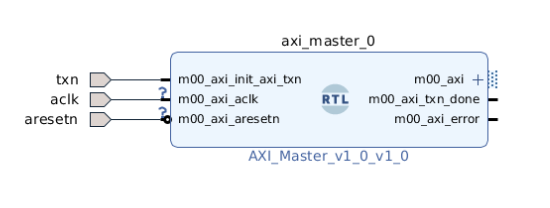
We can now connect an AXI VIP to the master interface of the custom IP to verify it.
-
Right-click on the BD, click Add IP and add an AXI Verification IP (AXI VIP) to the BD
-
Double-click on the AXI VIP to open its configuration GUI
-
Change the interface mode to Slave and click OK
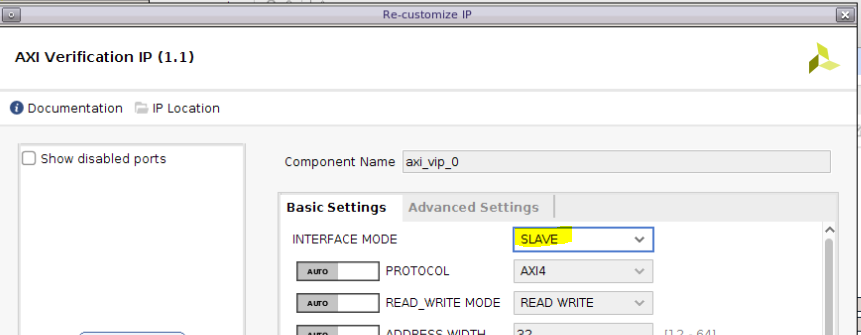
8. Connect the S_AXI input interface of the AXI VIP to the m00_axi output interface of the custom IP and the aclk and aresetn input ports of the AXI VIP to the corresponding input ports of the BD
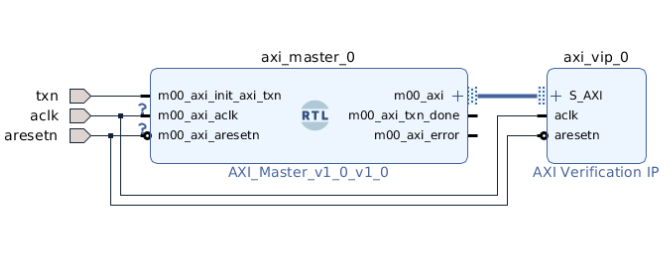
9. Open the Address Editor tab and click on the Auto Assign Address button. Make sure that the automatically assigned address for the AXI VIP is 0x44A0_0000, if it is not then manually assign this address

10. Validate the BD. You should have no issue or critical warning.
-
Save the BD
-
Enter the following command in the Tcl console to find the full component name for the AXI VIP instance:
get_ips vip
By default, the component name returned should be design_1_axi_vip_0_0
- Double-click on the test bench file AXI_tb from the sources window to open it in the text editor
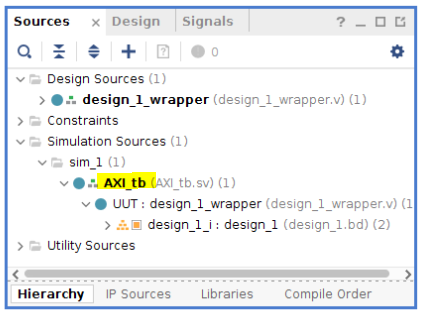
The AXI_tb test bench file already contains the code needed to run the custom IP. We just need to add the code required for the AXI VIP. As per the AXI Basics 3, we can just follow the Useful Coding Guidelines and Examples from PG267 (v1.1, October 30, 2019) p46.
First, import two required packages: axi_vip_pkg and <component_name>_pkg. Component name is the name which was returned from the get_ips in step 12
14. Add the following lines around line 58
//Import two required packages: axi_vip_pkg and <component_name>_pkg. import axi_vip_pkg::; import design_1_axi_vip_0_0_pkg::;
The next step is to declare an agent of type slave VIP.
- Add the following line around line 91
// Declare the agent design_1_axi_vip_0_0_slv_mem_t slv_agent;
Next we need to create the slave agent.
- Add the following line around line 96
//Create an agent slv_agent = new(“master vip agent”,UUT.design_1_i.axi_vip_0.inst.IF);
- In this tutorial, we need the AXI VIP to output the error in the console, so we need to enable the verbose mode using the following line (around line 99)
// set print out verbosity level slv_agent.set_verbosity(400);
- Finally, we can start the slave agent with the following line:
//Start the agent slv_agent.start_slave();
-
Save the test bench file and launch the simulation and run it for 200 us
-
Look at the Tcl console and search for the keyword “Fatal”. You should see the following line:
Fatal: AXI4_ERRM_AWADDR_BOUNDARY: A burst must not cross a 4kbyte boundary. Spec: section A3.4.1.
To understand this error we can look at the section A3.4.1. (as mentioned in the error message) in the AMBA® AXI™ and ACE™ Protocol Specification available from the ARM website (link))
In the specification we can see the following sentence:
“A burst must not cross a 4KB address boundary.”
21. Close the simulation and double-click on the custom IP axi_master_0 to open its configuration GUI.
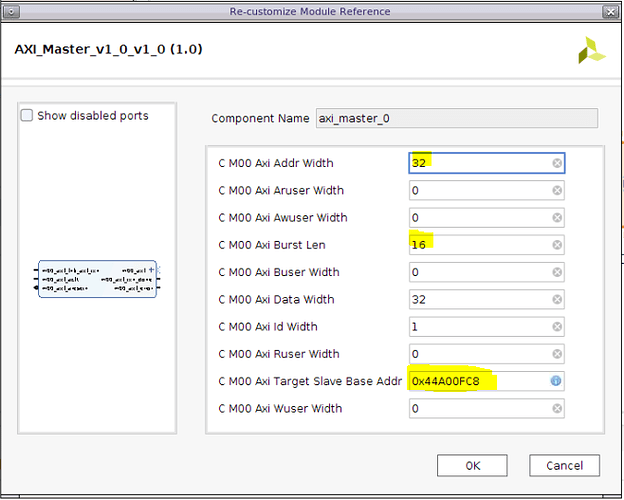
We can see that the custom IP is configured to send bursts of 16 32-bit words starting at address 0x44A00FC8. This means that the write bursts would start at address 0x44A00FC8 and end at address 0x44A01004. This is an error because the bursts cross a 4k boundary which is the address 0x44A01000 (4K = 4*1024 = 4096 = 0x1000).
22. Change the M00 Axi Target Slave Base Address to 0x44A00000, close the IP configuration GUI by clicking OK, and save the block design.
-
Re-run the simulation for 200 us.
-
Search for the keyword Fatal again. We can see that the error message has changed (which should indicate that the first issue is resolved).
You should now see the following error:
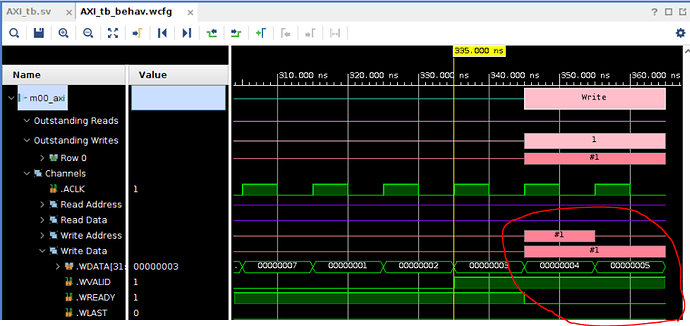
Fatal: AXI4_ERRM_WDATA_STABLE: WDATA must remain stable when WVALID is asserted and WREADY low. Spec: section A3.2.1.
- In the waveform window, expand the write data channel of the m00_axi interface. You will see that wvalid is indeed changing while tready is low which is against the AXI specification.
26. Close the simulation and open the file AXI_Master_v1_0_M00_AXI.v under the block design in the sources window
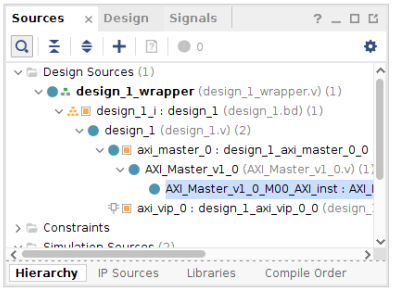
27. Update the following part around lines 506/518. This will prevent wdata changing while tready is low.
/* Write Data Generator Data pattern is only a simple incrementing count from 0 for each burst */ always @(posedge M_AXI_ACLK) begin if (M_AXI_ARESETN == 0 || init_txn_pulse == 1’b1) axi_wdata <= 'b1; //else if (wnext && axi_wlast) // axi_wdata <= 'b0; else if (wnext) axi_wdata <= axi_wdata + 1; else axi_wdata <= axi_wdata; end
- Save the file. A Refreshed Changed Modules option should appear. Click on it.

29. Re-run the simulation for 200 us.
You should not see any new error in the new simulation run and if you check the waveform windows, you should see the 16 write and 16 read burst transactions happening properly. This should mean that we have fixed the second issue.
Additional Learning
If you want to learn more about AXI, please see the other tutorials in this series:
https://support.xilinx.com/s/topic/0TO2E000000YNxCWAW/axi-basics-series?tabset-50c42=2


